Jira hosting: Server, Data Center, Cloud (since 2.7.2).
Managing dozens or hundreds of scheduled issues can be irritating and tedious, so we released some bulk operations to make The Scheduler easier to use. There are multiple actions that could be performed in a bulk way, to save you some time.
Bulk change state
Changing scheduled issue state is useful when you would like to disable or enable some scheduled issues.
Let's imagine you would like to suspend recurring tasks for some time - you do not have to do it manually again!

Select interesting scheduled issues
Click 'Enable / Disable' button above the table
Choose desired state of selected SI
Confirm action and that's it - your tasks have been updated!
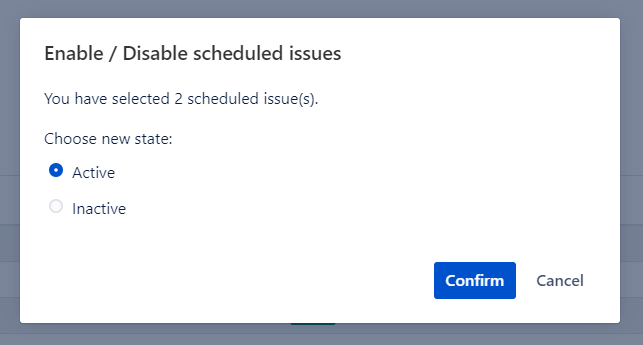
Notice that the expired scheduled issues can not be activated or deactivated, so they will be omitted while changing states. If you would like to activate expired SI, you have to do it manually via wizard to set up new trigger.
Bulk remove
It is important to keep your working space clean, so we faced up with bulk remove scheduled issues to let you keep SI table clean and without redundant entities.

The bulk removing nicely integrates with table filtering - it's easier to remove all of unnecessary scheduled issues. All what you have to do is:
Type phrase in filter input - just remember you can filter tasks also by state, so for instance it's easy to filter only the expired scheduled issues.
Select Scheduled Issues
Click ‘Remove' button (’Delete' button in Server/DC) and confirm an action
And that's it, your tasks have been removed!
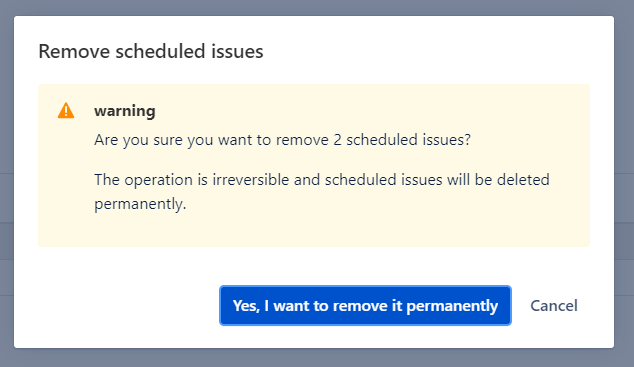
Notice that tasks are being removed permanently and you can not revert deleted SI.
Bulk execute
The scheduler is not only great tool to schedule recurring tasks, but also works awesome as a template tool. If you would like to create multiple issues manually in a few clicks, try bulk execution.

Select Scheduled Issues
Click ‘Execute’ button
Confirm an action - after that your tasks have been submitted for execution.

Notice that the tasks are being only submitted to execution, not executed yet. However don't worry - the submitted tasks will execute within several seconds.
Bulk manage access
Available only in The Scheduler for Jira Server, DC (since v6.2.0)
In order to grant access to a few Scheduled Issues at once, you can do it by Managing Access.
Select Scheduled Issues
Click ‘Manage Access’ button
Choose if you want to override or join existing sharing options
Select with whom you want to share the Scheduled Issues.
Confirm action.
Now, selected users should have access to all of the chosen SI.

Bulk clone
Available only in The Scheduler for Jira Server, DC (since v6.2.0)
You may have the need to create a copy of a few existing scheduled issues. If you don’t want to do it for each Scheduled issue, you can use our Bulk Clone option.
Cloning can be also used for moving copies of the existing Scheduled Issues to a different project. All you need to do is to choose the desired project in the modal.
Select multiple Scheduled Issues
Click 'Clone' button
Add prefix or suffix
Create a new description (optional)
Choose desired project
Confirm action and all selected SI should be duplicated
Remember, that you cannot create the same name as existing ones. Otherwise, it will result in an error message.

Remember, that you cannot create the same name as existing ones. Otherwise, you will not be able to create cloned issues.
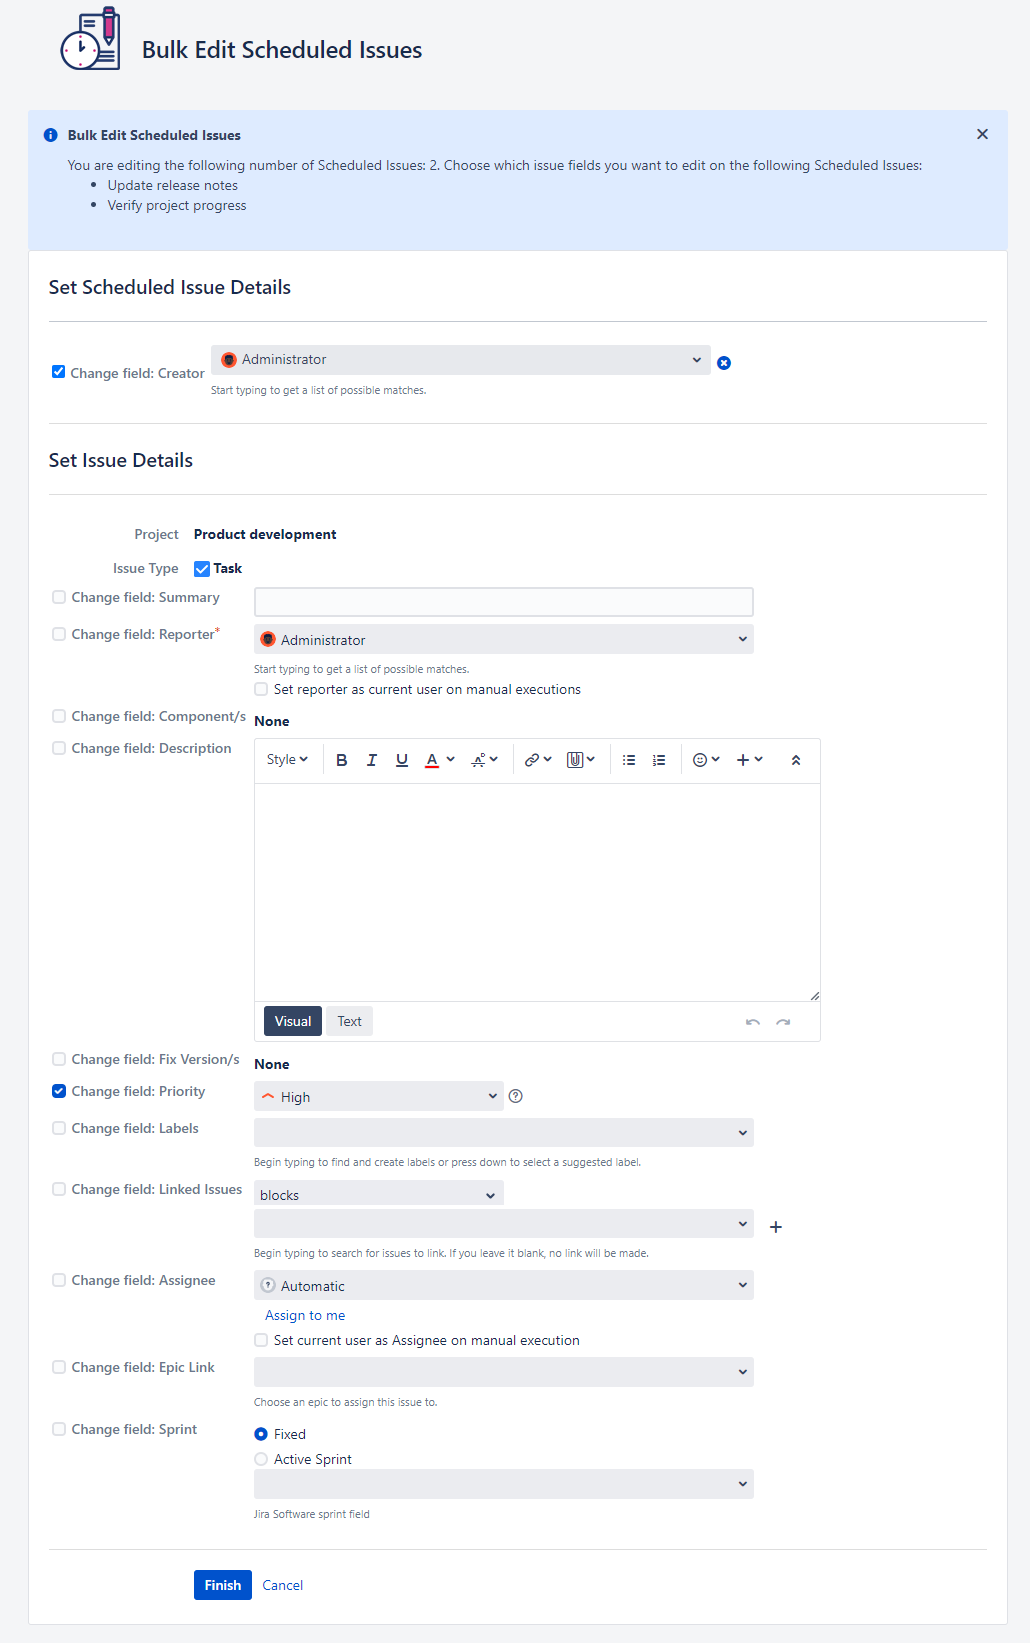
Bulk edit
Available only in The Scheduler for Jira Server, DC
Please, note that Bulk edit is supported only for Scheduled Issues with the same Issue type.
You can edit more than one scheduled issue at once, as long as they are the same issue type. To do so, you need to follow these steps:
Select Scheduled Issues with the same issue type
Click ‘Edit’ button
In the SI editor, you are able to mark fields that you want to edit and input new data.
Confirm changes and from now, new settings should be applied to all selected SI.
Save your time
The Scheduler contains bulk SI operations to let you save your time and get rid of tedious work. We also hope that showed use cases will help you in real business cases and you will be able to use The Scheduler app more efficiently.